Classroom Archaeology
This isn’t archaeology for the purist. It’s a manageable way of introducing pupils to the excitement of archaeological discovery without trowels, soil or kneeling in mud – or making holes in the classroom floor. But you can teach pupils quite a lot about the archaeological process if you wish.
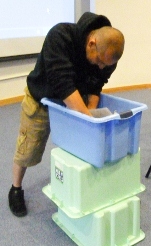
 The core of the activity is simple – fill a box with layers of paper and bury amidst the layers photographs of archaeological finds for pupils to ‘excavate’. It’s obviously not ‘real archaeology’ but with your ability to create interest and excitement and a sense of discovery it can be a memorable experience and has lots of potential for worthwhile history. And if you don’t do it this way – how else can you convey the excitement of discovery?
It may sound as if it takes a lot of setting up but it’s actually quite quick and cheap – and very repeatable with a variety of classes so an initial investment of an hour will pay off. And there’s a whole variety of contexts and topics it can be used for – so PLEASE NOTE…
There’s plenty of scope here for developing and adjusting this activity. What’s described below is the outline – please add your own details and variations to suit your classes and your own imagination and inspirations.
Objectives
There’s a range of possible objectives so this isn’t a definitive list but you could use this activity to help students:
• discover the kinds of artefacts excavated by archaeologist from a given period
• understand some of the disciplines of archaeology
• appreciate that discoveries are still being made each week that enable us to learn more about the past
• consolidate their knowledge of the chronological sequence of periods and their sense of period
Setting Up
 1. Gather a number of stacking boxes (could be cardboard boxes or any kind). They represent the archaeological layers/periods e.g. from top of pile downwards:
Industrial – Stuart and Tudor – medieval – Saxon – Roman – Iron Age
The number and periodization varies according to need- and the number of boxes available.
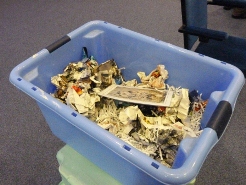
2. Fill the box to be excavated with layers of paper and pictures of the finds to be discovered. For example a Saxon box is shown below, from top down.
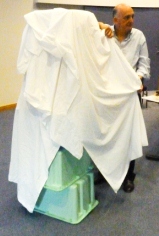
3. If you wish cover the stack of boxes with a sheet to make all this more mysterious – pupils wonder what this is all about at start of lesson – helps increase the sense of this being a special lesson about discovery.
A Saxon Box Example

1. Layer of balls of paper on top of:
Picture of Viking hoard – late 920s - found Harrogate in 2009 – left by Viking nobles fleeing Athelstan’s army. One coin shows Athelstan. Some coins from Russia and Afghanistan.
2. Layer of shredded paper on top of:
Picture of Alfred jewel – very late 800s – possibly a pointer for reading book in monastery
3. Layer of balls of paper on top of:
Picture - for example, one item from the Staffordshire Hoard – 3500 items – spoils of war, maybe royal loot collected over time - 7th or 8thC when Mercia most powerful kingdom
4. Layer of shredded paper on top of:
Picture from beginning of Saxon age - 5thC? – skeleton cemetery Wiltshire – 82 burials –male with shield – evidence re health – 14 yr olds the same height as modern 10 yr olds.
The Activity
 1. Remove the sheet and reveal the boxes – and explain what they are i.e. layers of soil to be excavated. Tell the class what period the top one represents, then ask them to tell you what the next one down might be – a handy consolidation of sequencing of periods with the extra difficulty of thinking backwards. Continue until you reach the layer to be excavated.
2. Ask a pupil (or pupils in turn) to excavate carefully the top layer within the box.
But before starting ask:
• what date or century are any finds from?
• what kinds of things might we find from this period?
 Then uncover the first item – and have a picture of it available on screen for everyone to see. Now for asking questions practice – get students to ask questions e.g. What is it? What is it made of? Why was it buried? Is it part of something bigger? Who might have owned it etc etc etc.
3. Repeat the excavation until you’ve found all there is to be found in the box – ensure students are getting the hang of the lower layers being an earlier date.
 4. Ask students how they could record what’s been found – and why this might be important for historians. Then get them recording the finds – you could ask them to draw a section of the excavated and annotate it and/or give them a table to complete with answers to a set of questions e.g. those above in (2).
5. Your chosen ending. For example, what have we learned from this about:
• the period?
• how discoveries are made?
• the importance of careful record keeping?
• particular artefacts?
• the continuing number of discoveries adding to what we know about the past?
• or other objectives.
6. Throughout try to maintain a sense of discovery, of wonder, of history being exciting but rigorous.
Ideas & Variations
1. Google images is the obvious source for pictures of artefacts but the British Museum and other museum sites will provide plenty of contextual information for finds. The BBC site is good for the latest discoveries.
2. Laminate pictures so they survive being found and handled!
3. Think about how difficult you want to make identifying the objects – do you want to include an obviously identifiable artefact or part of an object? Vary the demand according to the class.
4. Include pictures of coins alongside the pictures of finds to get across the idea of using datable coins to help identify the date of an object.
5. Maybe use a series of local finds – a recent visit to the Somerset County Museum showed me the wealth of material in just one county – and the sense of locality may help enthuse pupils.
6. Ambitious – use multiple boxes of finds with groups of pupils excavating different boxes – each box is a different period.
7. Find out whether you can borrow and use real objects from your local museums service or archaeological society.
8. Be explicit about ‘counting downwards’ i.e. the most recent finds are at the top of the stack or box, the equivalent to being nearer the surface of an excavation.
9. Ask ‘what would you expect to find in this layer?’ – to focus pupils on what kinds of objects do and don’t belong in a period.
10. Make use of recent discoveries – if a big find like the Staffordshire hoard is in the news this is one way to introduce it in the classroom, simulating (very roughly) the discovery.
11. Build in some work on the archaeological process – get students to draw 3D charts of their finds, showing the relationship of one find to another and writing up a report on what’s been discovered.
