
The Mystery of Tollund Man
Not just a grand activity but a hefty dose of nostalgia too if you remember the early days of SHP. In the summer of 1976 my school adopted SHP and the best bit was opening the What is History? boxes, each containing ten copies of each teaching item – and none of them looked like normal textbooks. Even the books were unusual shapes but most fun were the Mark Pullen wallet and the Tollund Man leaflet headed ‘Detective Work’ – what a novel idea! It’s hard now to realise what a revolution that all was. So here’s Tollund Man again – updated by Susan Edwards and Nichola Boughey, at Weatherhead High School Media Arts College, Wallasey, to help their Year 7 students develop better source work and investigation skills without realising they’re doing so amongst the fun.
 While you’re reading, note Susan and Nicky’s use of suspense – by covering the ‘body’ they at first hid the focus of the lesson from students – creating interest and a sense of intrigue. It’s worth thinking about trying this in your own classroom if later in a lesson you’re going to use an artefact or ‘prop’ – don’t hide it out of site but put it prominently on view but completely covered. Leave it for students to be intrigued by – it certainly worked when I did this at the 2009 SHP conference, having a table full of props for an activity but covered with a sheet. Even 200 hardened History teachers were curious about what was hidden from view.
And a final thought – reading this just emphasises how much time, thought and effort teachers like Nicky and Susan put into their work. This is true of so many History teachers all over the country – and they’re prepared to share their ideas too.
Now over to Nicky and Susan to describe their activity.
Download
A WORD version of this activity and accompanying resources can be downloaded:
For Activity file [ click here ]
For the room plan [ click here ]
For the PowerPoint [ click here ]
For a selection of Nicky and Susan’s pictures [ click here ]
Outline
Like many effective activities in History lessons, this one began with the diagnosis of a learning problem – just how much students hate using sources when answering questions. The moment that a History teacher mentions source investigation is usually the moment that students across all Key Stages switch off in lessons. So what if the historical investigation was Tollund Man’s body in a crime scene, sources become police evidence, the teachers the detectives and the students assume the role of forensic investigators? Suddenly sources seem more like fun (especially if you don’t mention the word sources)!
Below we describe how we developed and resourced the activity for a 50 minute lesson but there’s plenty of scope for varying the props to use as well as the various items of props. The purpose is to enable the students to develop source skills in a relaxed and enjoyable manner. Students will also learn about Iron Age lifestyles, religions, customs, and treatment of cowards, traitors and slaves all through the examination of how the Tollund Man died. This enables pupils to build a fuller picture of the life of a person living on mainland Europe during the Iron Age.
In brief, this VAK activity sets up the classroom as a 1950s crime scene. The whole class play the role of the Danish police investigators and are distributed around the classroom with a central space in the middle of the room set up as a crime scene complete with fake body and crime scene tape. The main roles of the Chief Inspectors are played by class teachers or other colleagues such as Learning Assistants – in this particular lesson the activity was team taught with both History teachers involved and leading the activity at different times supported by their teaching partner.
Learning Objectives
This activity is therefore intended to help students develop an understanding of:
• how sources can be used effectively to solve or discuss historical events.
• the nature of Iron Age life, i.e. treatment of slaves, cowards, traitors and captured enemy soldiers.
• the importance of religion on Iron Age people in Europe.
The NC Key Objectives for History that will be met by the Tollund Man Mystery will be the development of student awareness regarding cultural, ethnic and religious diversity in different past European societies.
Through the outlined activity below students used the key NC processes of:
• historical enquiry
• the use of historical evidence
• developing the ability to communicate about the past
Lesson Preparation
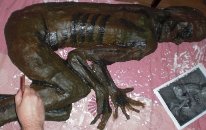
1. For maximum interest it was decided to create a fake body to represent Tollund Man. This ‘body’ was life-sized and based on photograph of Tollund Man. It was made out of chicken wire, covered in modroc (a fancy version of plaster of paris), and then painted to give it a more authentic look. This took approximately 15 hours to make, but was considered to be worth the time as this would be a lesson taught by all members of the History Department in the future.
2. Other props are needed for the lesson including:
• a piece of rope and a neck ring (both to be placed around the neck of the body),
• a leather belt (placed around the body’s waist),
• seeds and a tin of soup,
• dried flowers,
• police hats for staff if you can find/make them.
• a spade
3. Room layout - before teaching this lesson we were fortunate to have a fifteen-minute break, during which we were able to set up the classroom for this lesson. For the lesson to have its full impact, it would be necessary for the teacher to set up the room fully before the students entered. Attached is a suggested classroom plan with 5 main desks or tables for groups of students to work at. [ See room plan ]
The students need to work in groups and the classroom layout should reflect this. Tollund Man should be in the centre of the room, and covered so that the students cannot see what is under it. Crime scene tape is placed around the body to add to the sense of mystery. Each group has an envelope of evidence on their desk which they will open when instructed to. The back wall of the classroom is used as an evidence wall, which will be used during the course of the lesson.
4. PowerPoint slides of evidence [ See PowerPoint ] were printed off, laminated and sealed in an envelope and placed on the desks. Each group had up to 3 of the sources – not all of them. These sources contain a picture and some text information for each group to look at and read out to the rest of the class.
The PowerPoint containing all the sources should be shown to the rest of the class on the IWB when each group is reading out their source.
Lesson Delivery
Step One: Discovery
The key to having a good start to this lesson is for both teachers to greet the students at the classroom door already acting in their roles as police inspectors from Denmark (wearing police hats really grabs student attention straight away) One teacher gives each student a card numbered 1-5 (relates to pre-numbered tables) and one teacher explains that they are now acting as forensic investigators in Denmark. Once the students are sat down then one teacher assumes the explanation role. Explain that the purpose of this activity is to investigate the discovery of a dead body in Tollund Fen in Denmark in 1950 and how the person was killed. The students can already see the covered dead body and their curiosity will be peaked!
Then:
Ask the students to close their eyes. Both teachers can check that this is happening.
a. Teacher One changes the police cap for a farmer’s cap and picks the spade up.
b. Teacher Two asks the students to mime picking up a spade and dig in front of them.
c. Teacher One bangs the spade on the floor next to the crime scene and make a shocked sound. Teacher Two removes the cloth from the dead body.
d. Students will open their eyes and see the newly uncovered dead body & a picture of the Tollund Man’s face on the IWB.
e. Teacher One explains to the students how they have discovered the dead body whilst digging peat and are now watching it whilst somebody calls the police.
f. Teacher One then asks the students what questions they might have about the dead body before the police arrive.
After attending an INSET on ‘Teaching Outstanding Lessons’, Susan was given an insight into the core considerations that could be adapted to assist teachers in planning and delivering ‘outstanding lessons’ to OFSTED criteria. One of these core considerations is to prepare students’ minds, as it is important to focus the students and engage them as soon as they enter the classroom. Teachers should aim to create a sense of urgency and mystery at the start of the lesson. This is achieved with the teachers dressing up or in role, as well as the crime scene that the students encounter on their entrance to the classroom. The first task, emphasizing the importance in History of asking questions as well as answering them, could be to think of and write down five questions they would like to ask about the crime scene.
This gives students time to develop both HOTS and develop their own PLTS because there are no right or wrong questions here – it is open ended and students can be as creative and innovative as they wish with their questioning based on what they can see.
Step Two: The Investigation
This is where the investigation of the different pieces of evidence (sources) takes place. Across the back wall of the classroom are three notices:
1. Murder
2. Suicide
3. Sacrifice
Then:
a. Teacher Two asks the students if they understand what the three words on the notices mean (expect students to struggle with ‘Sacrifice’ - this is the one that needs the most explanation as it is the most relevant) giving them plenty of time to answer.
b. Teacher One explains that the students will now examine some evidence to try to discover the identity of the dead body, how old he is and how he died?
c. Each table has up to three envelopes with a source in each that relates to the PPT slides.
d. Teacher One directs students to open envelopes (A-I) one at a time– this leads to students discussing the evidence and deciding under which heading they wish to place the evidence. See Step Three below for details of the Sources and the points that can be made about each.
Step Three: Evidence
Evidence A – Rope Noose and Iron Neck Ring
• Students will have already noticed the iron ring and noose around the body’s neck. Source A is a picture of the items plus some text for the students to read out.
• Teacher action/explanation – get the students to try and work out what relevance the noose and neck ring have. The teachers should draw out the ideas that criminals, slaves and captured enemy warriors would have been forced to wear iron rings around their necks and also may have been executed (murdered) by strangulation. It is also an opportunity to raise the idea of a Spring Goddess.
• Students then vote on whether the evidence supports suicide, murder or sacrifice – they blue tack it under the heading that they choose.
Evidence B – Scientific Report
• Students will read out Source B which is a copy of the Scientific Report . The class will then discuss it as a group to try and find out some key details.
• Teacher action/explanation – the role of the teacher here is to draw out the students’ ideas about the age of the body, how long ago the person died and why the fact that the seeds in the man’s stomach were Spring related may be important. (Evidence bags with seeds and squished plants make very effective additional evidence (you could hide the bag under the dead body and get a student to retrieve it).
• Students then vote on whether the evidence supports suicide, murder or sacrifice – they blue tack it under the heading that they choose.
Evidence C – The German Tribes
• Students will read out Source C which is a simple statement about German Tribes hanging traitors and cowards.
• Teacher action/explanation – Teacher One will be accused of being a traitor in front of the class by Teacher Two – use some excuse, i.e. told a secret to a friend. This leads into a discussion about what type of action would a traitor in the Iron Age be accused of, i.e. helping the enemy or stealing food from the tribe.
• Teacher action/explanation – Teacher Two can be accused on being a coward – afraid of spiders. Get the class to draw out other words for coward, i.e. wimp, scared etc.
• The class will then discuss how both cowards and traitors were killed and vote on whether the evidence supports suicide, murder or sacrifice – they blue tack it under the heading that they choose.
Evidence D – Earth Goddess Statue
• Students will read out Source D which is a simple sentence about Earth Goddess statues being found in Danish Peat Bogs.
• Teacher action/explanation – this is a key point to re-enforce that Earth Goddess statues were linked to Spring Time (with subtle questioning redirect students back to seeds, soup and the scientific report information as well as how neck rings were placed on people’s bodies as offerings to Earth Goddess).
• Students then vote on whether the evidence supports suicide, murder or sacrifice – they blue tack it under the heading that they choose.
Evidence E – Spring Goddess Statue Sacrifice
• Students will read out Source E which is provides information about the sacrifice of slaves to the Spring Goddess.
• Teacher action/explanation – As the student is reading out the evidence Teacher One should remove the noose and neck ring from around the dead body’s neck. Teacher Two should will explain to the students that tribes often fought each other and if enemy warriors were captured they were often more valuable alive as slaves than dead – this was a common practice at this time – hence the neck ring. Teacher One makes a big deal about declaring themselves stronger, tougher and a better warrior (they are holding the neck ring and noose) whilst Teacher Two has to make it evident that they are weaker and have been captured (kneeling on the floor with their head bowed works well and made the class laugh). Teacher One asks the class how can they make it obvious that Teacher One now belongs to them as an Iron Age slave – they will suggest putting the neck ring around Teacher Two’s neck.
• Teacher Two then very grumpily explains that one of his/her duties as a slave was to wash the cart that carries the statues of the Spring Goddess and that they accidentally touched it – Teacher One can then demand that Teacher Two be sacrificed.
• Students then vote on whether this evidence supports suicide, murder or sacrifice – they blue tack it under the heading that they choose.
Evidence F – Traitors, Cowards and Low Morals
• Students will read out Source F which is provides information about the sacrifice of people with low morals to the Spring Goddess.
• Teacher action/explanation – Teacher Two will accuse Teacher One of having low morality in front of the class – e.g. he or she lied. This leads into a discussion about what type of person has low morals – criminal is where you are going with this.
• Students then vote on whether the evidence supports suicide, murder or sacrifice – they blue tack it under the heading that they choose.
Evidence G – Cremation
• Students will read out Source G which is provides information about how most Iron Age people were cremated apart from those people who were sacrificed.
• Teacher action/explanation – get the students to try and make the link between the noose around the dead body and the fact that he was not cremated.
• Students then vote on whether the evidence supports suicide, murder or sacrifice – they blue tack it under the heading that they choose.
Evidence H – Slave
• Students will read out Source H which is provides information about Iron Age slaves.
• Teacher action/explanation – refer back to Evidence E.
• Students then vote on whether the evidence supports suicide, murder or sacrifice – they blue tack it under the heading that they choose.
Evidence I – X-Ray
• Students will read out Source I which is provides information the X-Rays taken of the Tollund Man’s neck.
• Teacher action/explanation – the aim here is to explain to students that criminals were often hung very violently but a sacrifice or suicide would have been more gentle and the neck would not have been broken.
• Students then vote on whether the evidence supports suicide, murder or sacrifice – they blue tack it under the heading that they choose.
Now that all of the evidence has been discussed and pinned up – the class now makes a decision.
Debriefing of the Students
There are two elements of this, firstly completing the Tollund Man enquiry and secondly, more important in the long-term, identifying what has been learned about enquiry and using sources.
Completing the Tollund Man enquiry - students, in their groups, could write and film a short film / reconstruction of the death of Tollund Man for a ‘Crimewatch’ type show. Individually, write a crime report or newspaper report. Students could then use peer assessment to mark each other’s films or reports, perhaps someone from a different group so they might take a different slant on what they think happened to Tollund Man. We would perhaps include some sort of written activity for the students to complete during the lesson. This could be used to support future tasks. Whichever activity route is taken it must be clear to students that they need to think about how they communicate their ideas – what kinds of language do they use to discuss probabilities and possibilities, do they discuss the questions and hypotheses developed?
Understandings of enquiry and sources - it’s essential to make very clear that this activity has been about conducting enquiries and using sources as evidence – so that students don’t see the content as the sole purpose of the lesson. This needs very explicit questioning – e.g. what have you learned from this lesson? How does this lesson link to other skills and lessons in History? Can students identify the enquiry process they’ve been through and what they have learned about using sources as evidence?
Summarising this as a diagram may help, using the topic to exemplify the stages – for discussion of enquiry on this website [ click here ].
Teacher Reflections on the Activity
• Great lesson for enthusing students when they are using sources.
‘Outstanding’ start to the lesson. Grabbed their attention straight away.
Great response from the students. They seemed engaged and mentioned as they were leaving that they thought that it was a really good lesson.
A very effective lesson for all abilities, stretch and challenge will be achieved by appropriate questioning.• Good for VAK learning.
• Cross-curricular elements (Drama, Geography, RE, PSHCE, Citizenship).
• A lot of effort for one lesson, but the follow-up to the lesson / homework etc could ensure it is worth it. Also, once resources are made, they can be used by the whole dept and in the future, as this is a lesson we would teach every year.
In addition thought needs to be given to planning into the KS3 scheme of work where and when you will refer back to this lesson – its great strength is its memorability – ‘do you remember when ..’ and so future enquiries have a high chance of re-using students’ memories of the activity to build up their independent enquiry skills using sources as evidence.